Dubbing Studio

Fine-grained control over your dubs.

Dubbing Studio is in maintenance mode. It continues to receive critical bug fixes only, and no new feature work is planned. Existing Dubbing Studio customers keep uninterrupted access.

Create a Dubbing Studio project

  1. Check the ‘Create Dubbing Studio’ box when creating a dub.
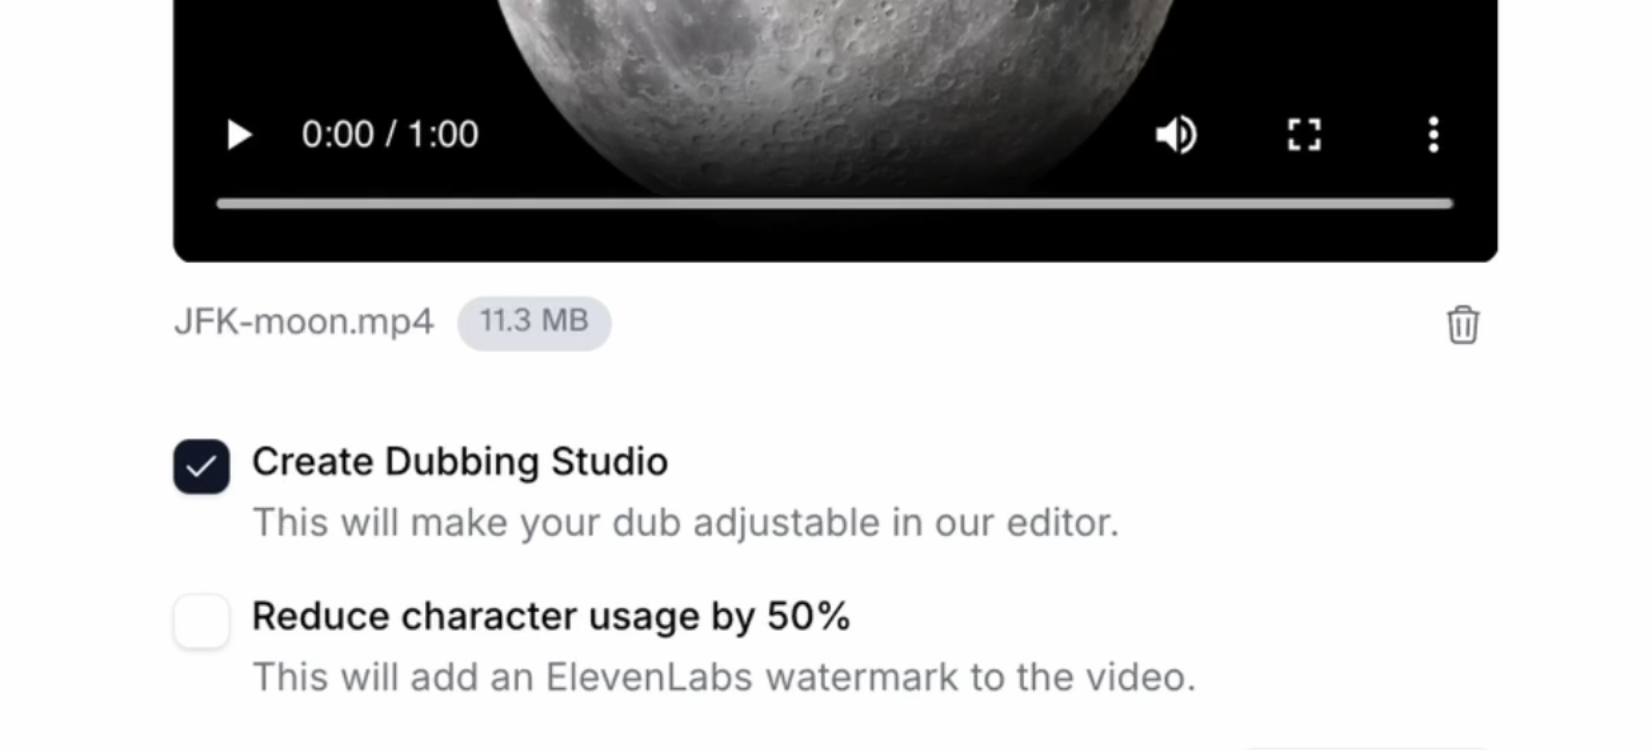
Create Dubbing Studio Project

  1. Click on Create Dub. Once the Dubbing Studio project is created, you will be able to open it.

Core Concepts

Speaker Cards

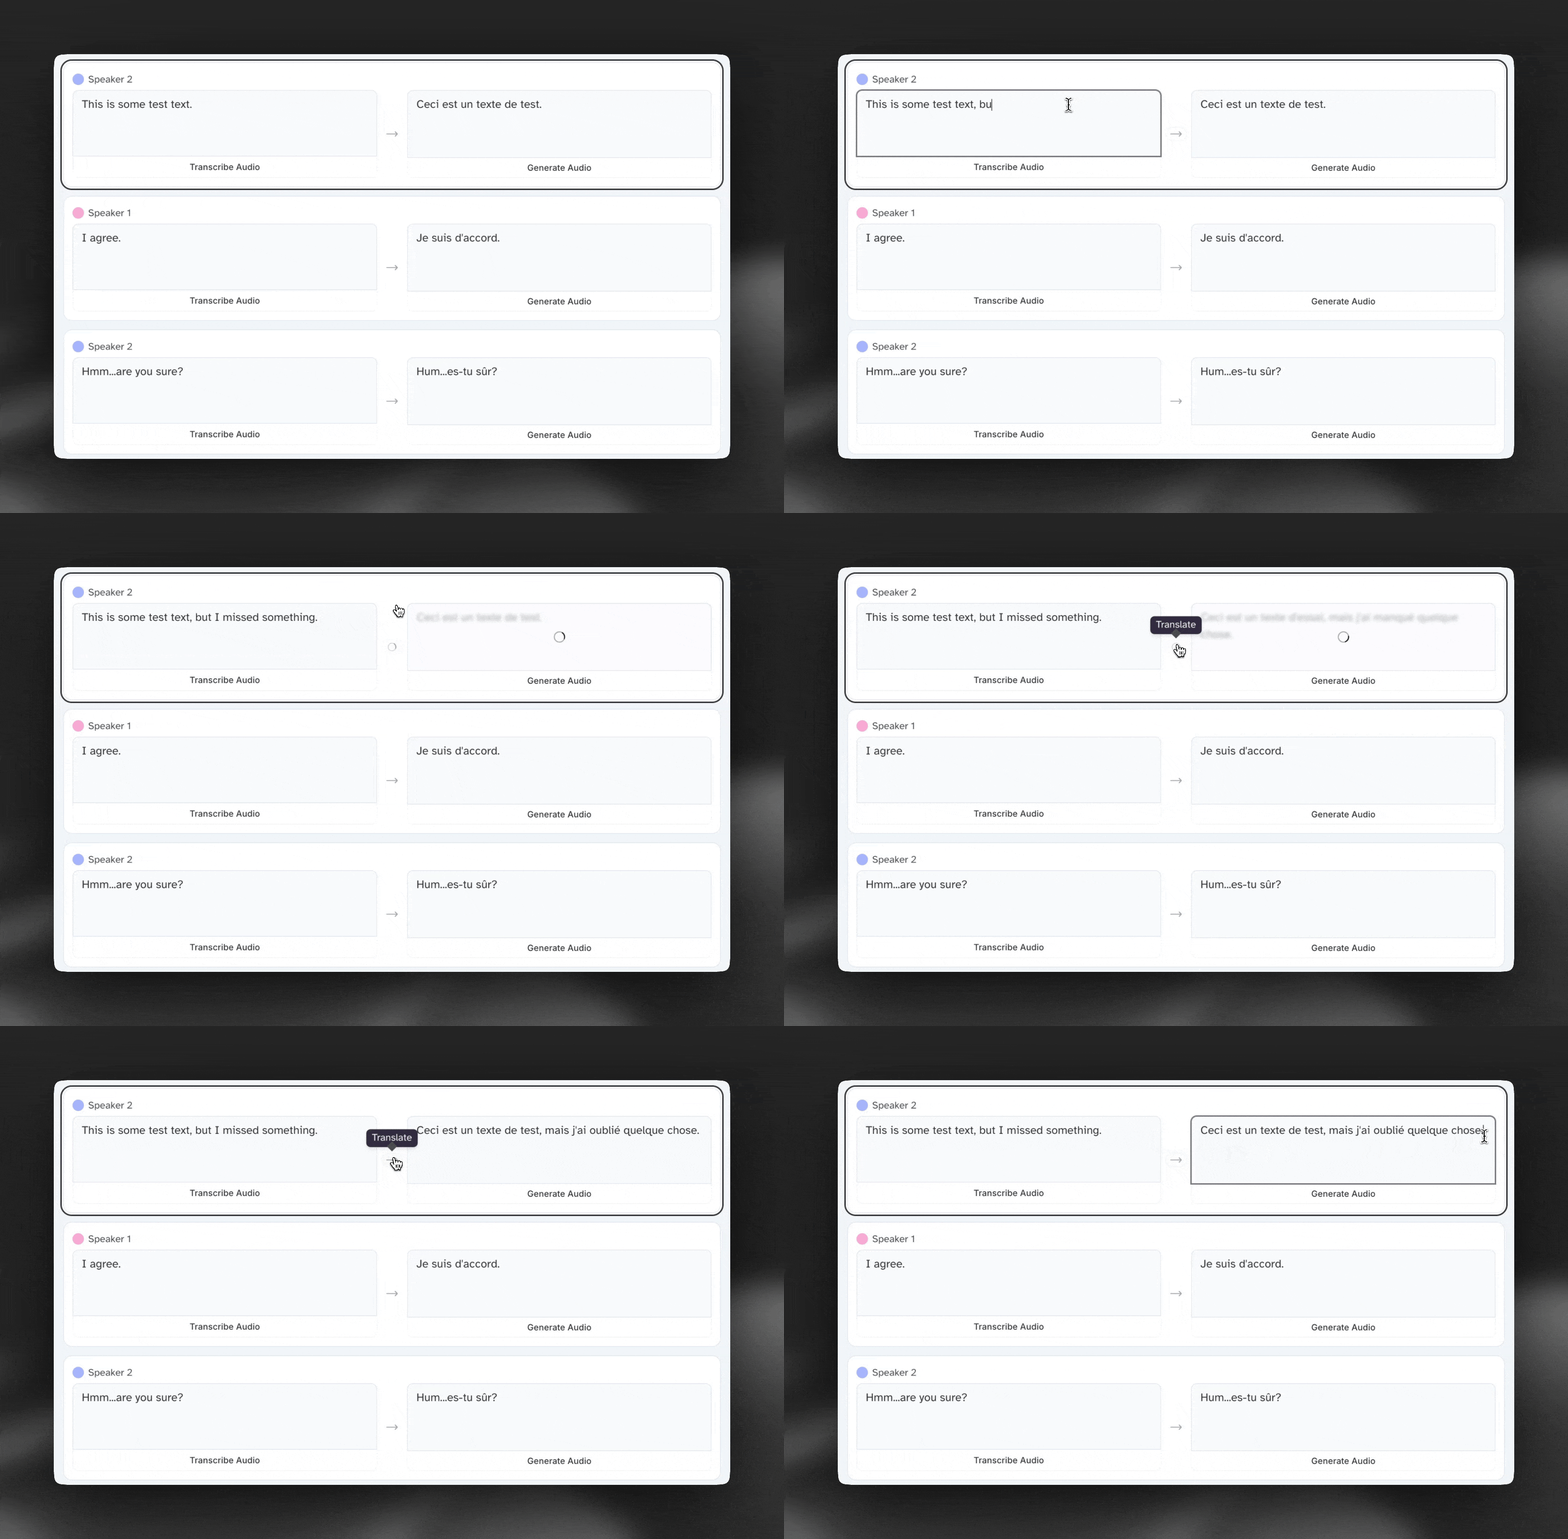
Dubbing Studio Speaker Cards

Speaker cards show the original transcription and translation (if you add one) of dialogue from the source video. You can click ‘Transcribe Audio’ to retranscribe the original speech, or click the arrow to re-translate an existing transcription.

Edit Transcripts and Translations

Both transcriptions and translations can be edited freely - just click inside a speaker card and start typing to edit the text.

Speaker Identification

You can see the name of each speaker in the top left of the speaker card. To change the name of a speaker or reassign a clip to a different speaker, you’ll need to use the Timeline.

Timeline

The timeline contains many important elements of Dubbing Studio, covered in more detail in different sections below:

Basic navigation

There are 3 main ways to navigate the timeline:

  1. Click and drag the cursor
  2. Horizontally scroll
  3. Input a specific timecode on the right side of the timeline

Adjust clips and regenerate audio

  1. Drag the handles on the left or right side of a clip to adjust its length.
  2. Click the refresh icon to regenerate the audio for that clip.
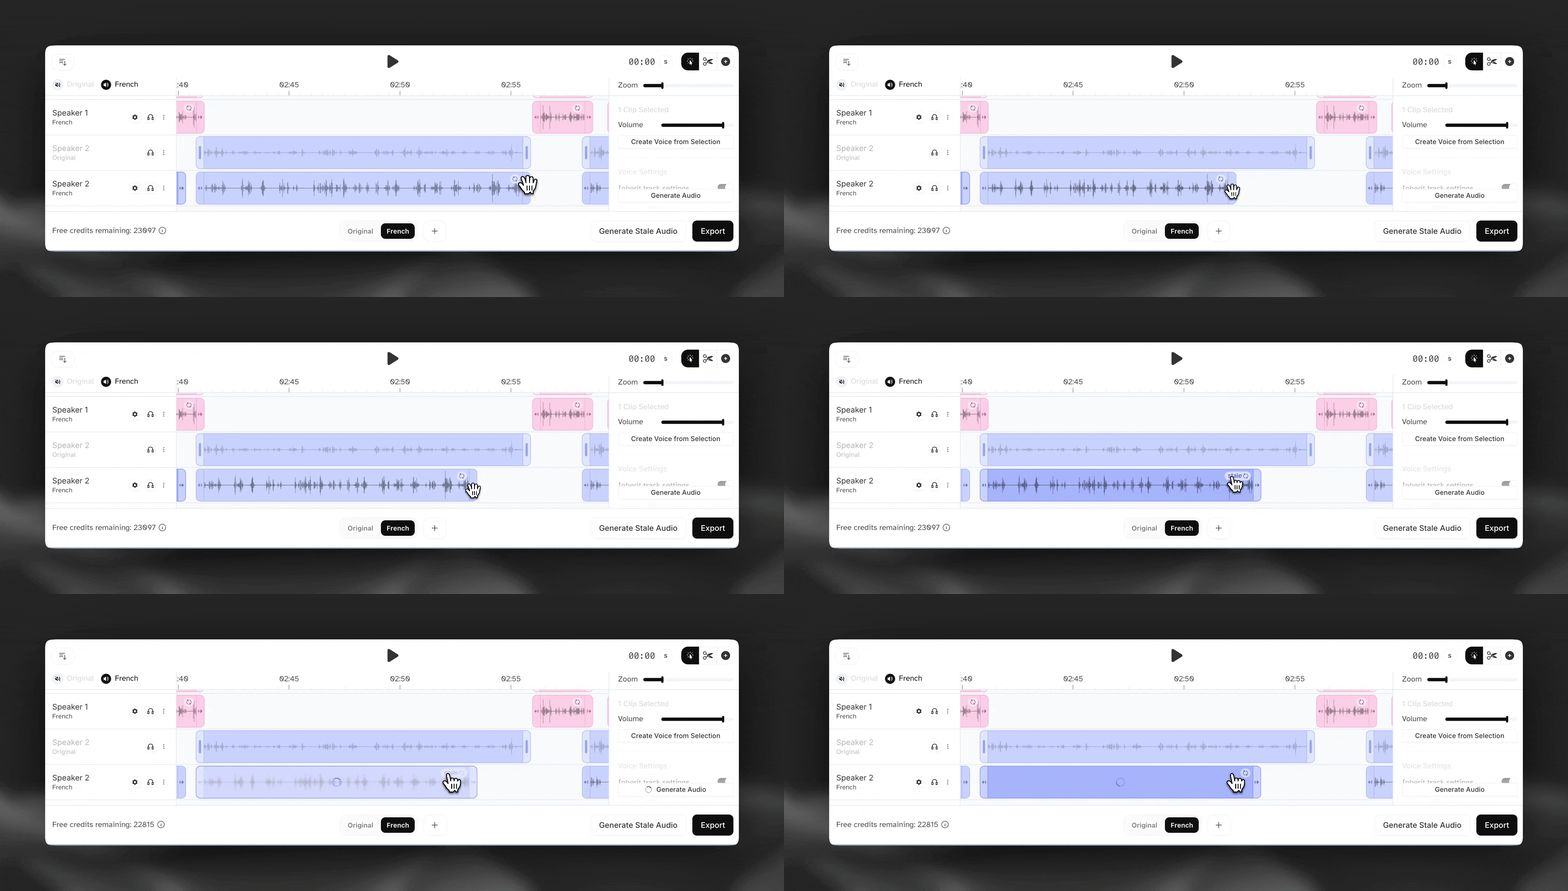
Dubbing Studio Adjust and Regenerate

Dynamic vs. Fixed Generations

NOTE: By default, all regenerations in Dubbing Studio are Fixed Generations, which means that the system will keep the duration of the clip fixed regardless of how much text it contains. This can lead to speech speeding up or slowing down significantly if you adjust the length of a clip without changing the text, or if you add/remove a large number of words to a clip.

Consider a clip with the phrase ‘I’m doing well.’ If that clip were set to last 10 seconds and the audio were generated using Fixed Generations, the speech would sound slow and drawn out.

Alternatively, you can use Dynamic Generations by right clicking a segment and selecting it from the options. This will attempt to adjust the length of the clip to the length of the text and make the audio sound more natural.

But be careful – using Dynamic Generations could affect sync and timing in your videos. If, for example, you select Dynamic Generation for a clip with many words in it, and there is not enough room before the next clip for it to properly expand, the audio may not generate properly.
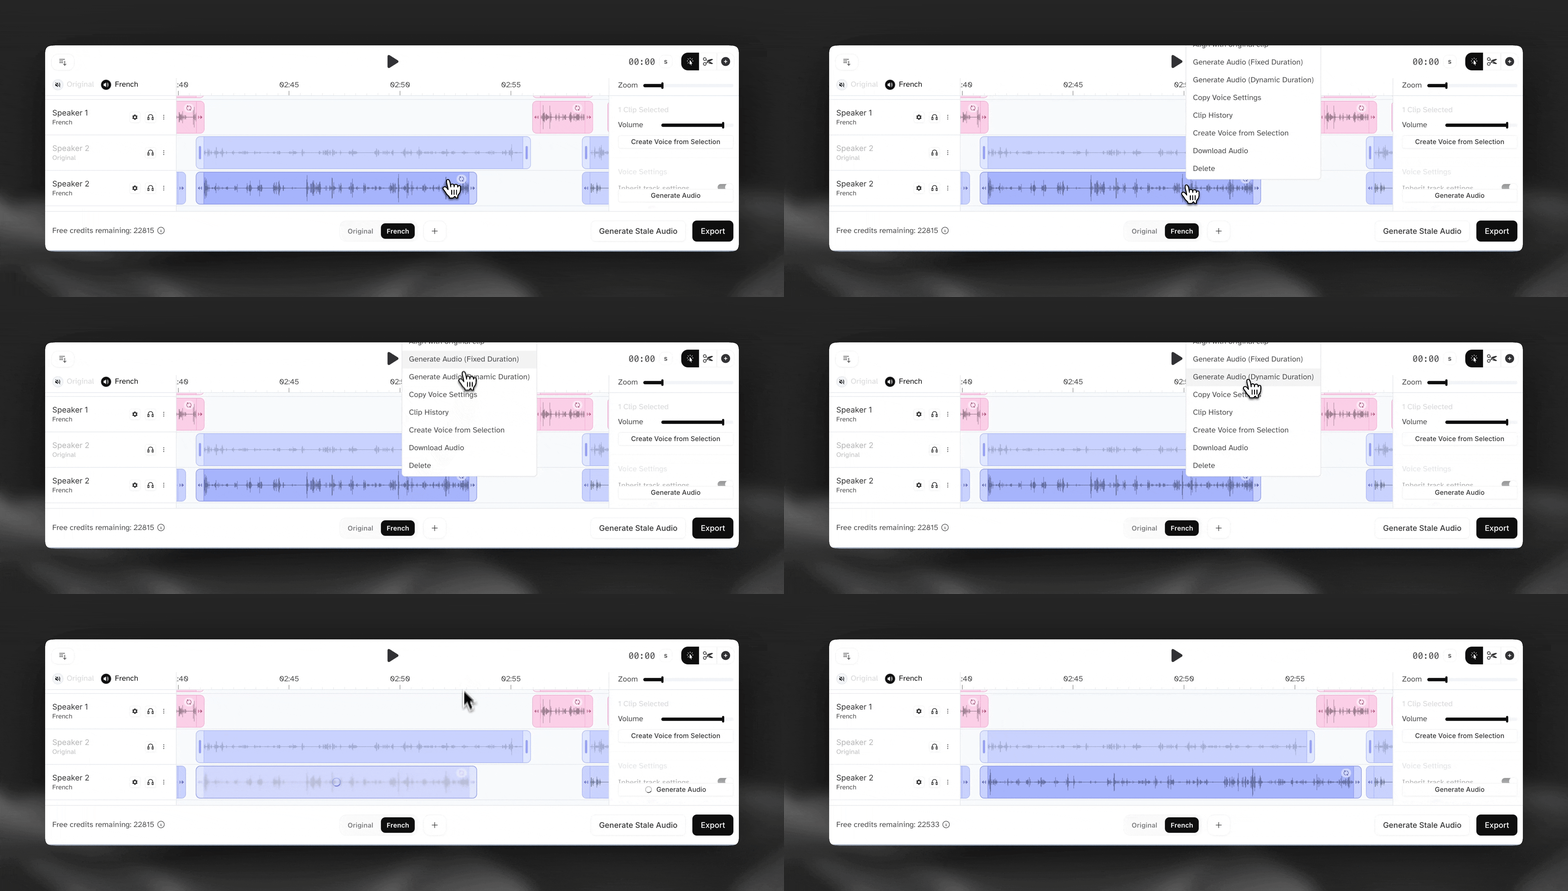
Dubbing Studio Dynamic Generation

Stale Audio

Stale audio refers to audio that needs to be regenerated for one of many reasons (clip length changes, settings changes, transcription/translation changes, etc). You can regenerate stale clips individually or click ‘Generate Stale Audio’ to bulk generate all stale audio clips.

Clip History

You can right click a clip and select ‘Clip History’ to view previous generations and select the one that sounds best.

Split and Merge clips

  1. To split a clip, move the cursor to a specific timecode and click ‘Split’.
  2. To merge two clips, drag the ends of the clips together and click ‘Merge.’
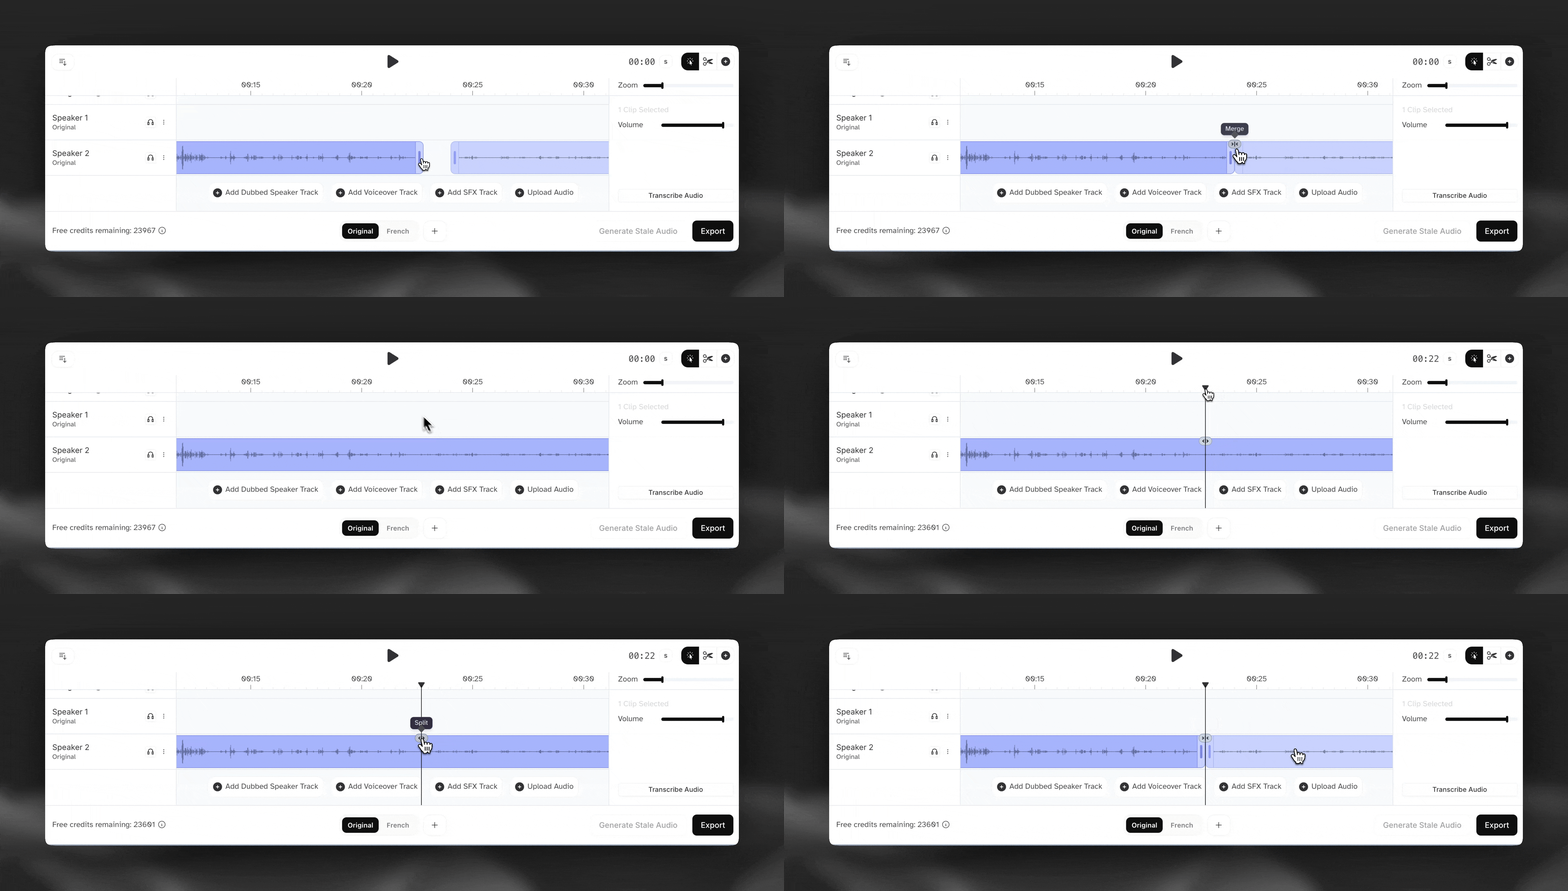
Dubbing Studio Merge

As you split and merge clips, the speaker cards above the timeline will update to reflect these changes.

Reassign clips to different speakers

To reassign a clips to a different speaker, click the segment and drag it to another track.
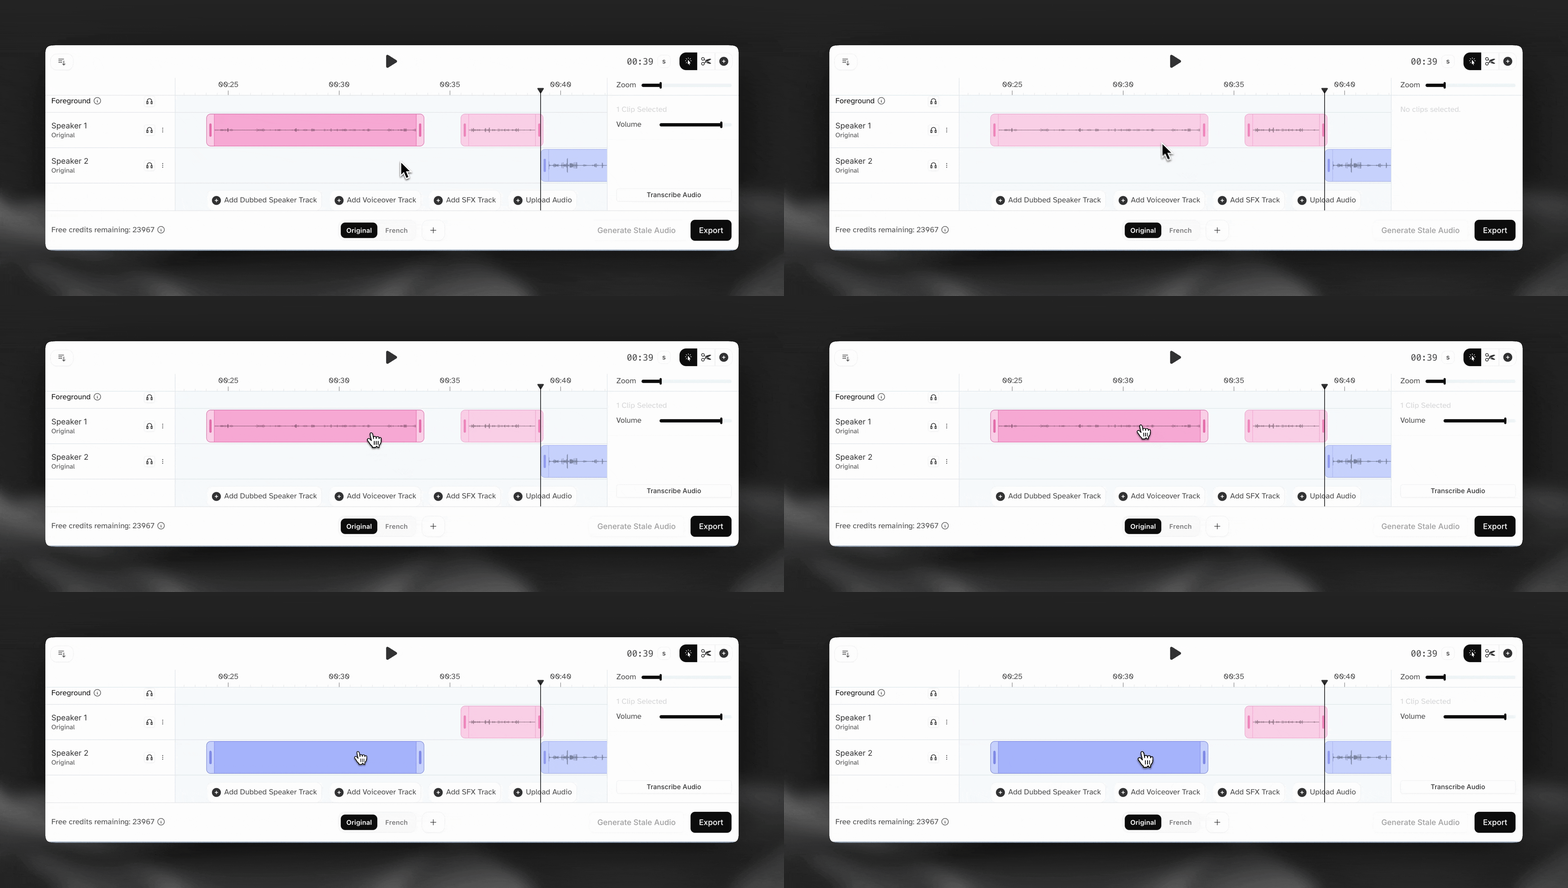
Dubbing Studio Reassign Clips

Add additional audio tracks

Use the action buttons at the bottom of the timeline to add new audio tracks
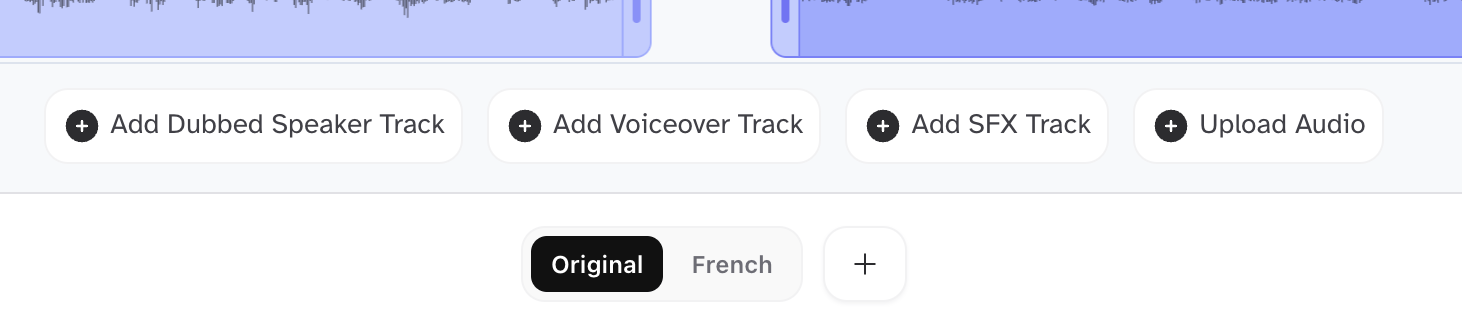
Dubbing Studio Add Tracks

Voice Settings

Voice Selection

To select the voice that will be used to generate audio on a specific speaker track, click the settings cog icon on the left side of the timeline near the speaker name.

There are 3 main types of voices to choose from in Dubbing Studio:

  1. Clip clone - this creates a unique voice clone for each clip based on the source audio for that clip
  2. Track clone - this creates a single voice clone for the whole track based on all source audio for a given speaker
  3. Other voices - you can also choose from thousands of voices available in our Voice Library, each with detailed metadata and tags to help you choose the right one

You can also create, save, and reuse a voice from a specific clip by right clicking the clip and selecting ‘Create Voice from Selection.‘

Setting Track vs. Clip Level Settings

You can set voice settings at two levels:

  1. Track Level - changes will apply across all clips in the track, which can help with stability and consistency.

  2. Clip Level - changes will only apply to a specific clip. To set clip-level settings, use the panel on the right side of the timeline. Disable the ‘inherit track settings’ toggle and configure your desired settings.
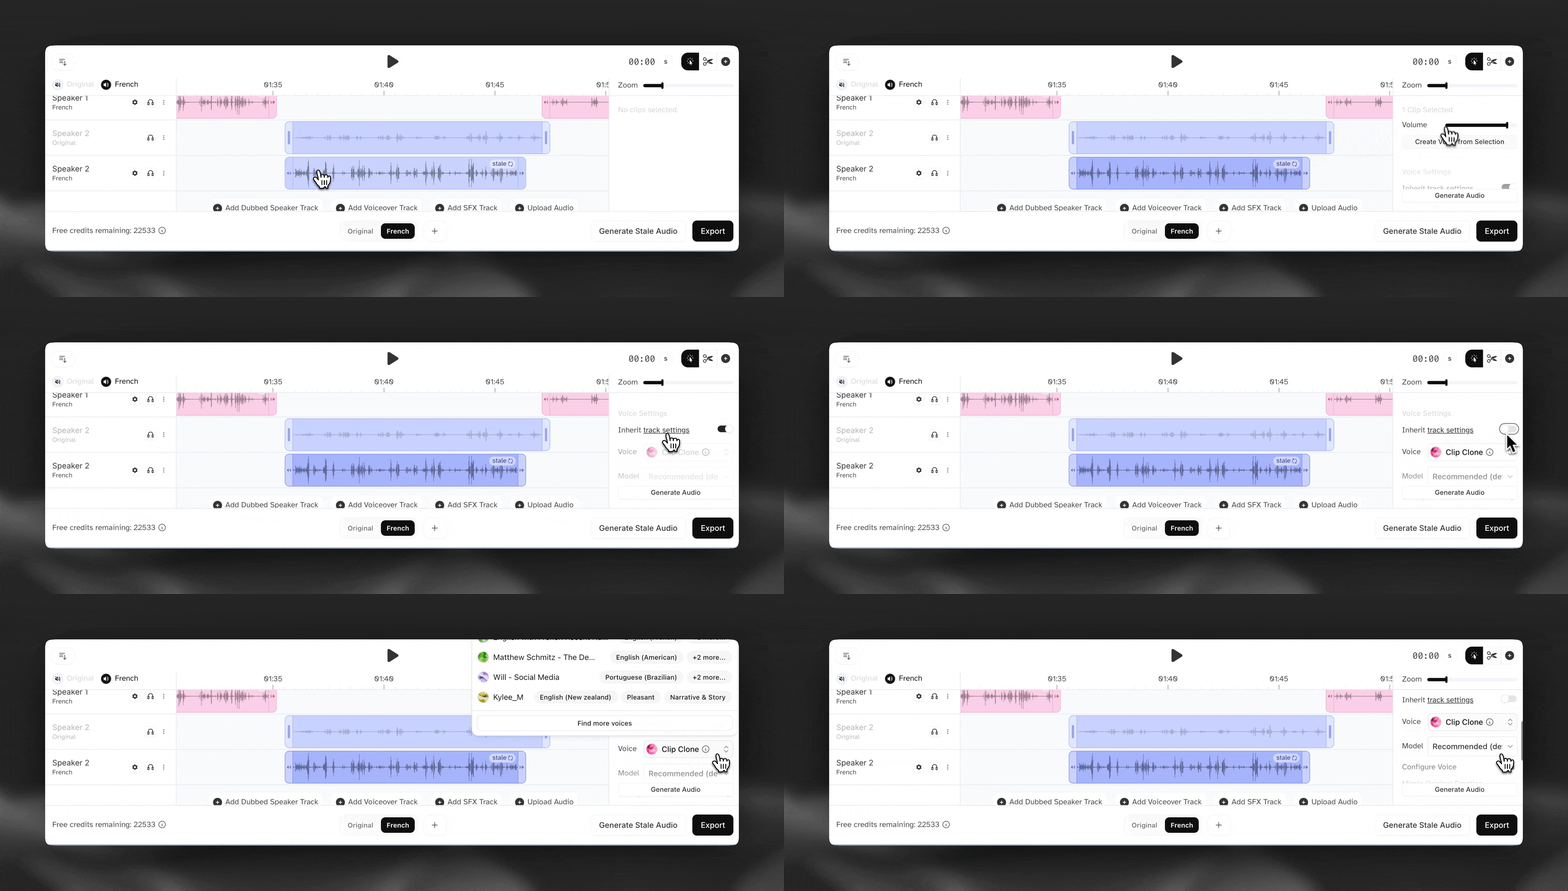
Dubbing Studio Voice
Settings

Exports

Click ‘Export’ in the bottom right of Dubbing Studio to open the export menu.

Dubbing Studio currently supports the following export formats:

  • AAC (audio)
  • MP3 (audio)
  • WAV (audio)
  • .zip of audio tracks
  • .zip of audio clips
  • AAF (timeline data)
  • SRT (subtitles/captions)
  • CSV (speaker, start_time, end_time, transcription, translation)

Make sure you select the correct language when exporting.

Additional Features

  • Voiceover Tracks: Voiceover tracks create new Speakers. You can click and add clips on the timeline wherever you like. After creating a clip, start writing your desired text on the speaker cards above. You’ll first need to translate that text, then you can press “Generate”. You can also use our voice changer tool by clicking on the microphone icon on the right side of the screen to use your own voice and then change it into the selected voice.
  • SFX Tracks: Add a SFX track, then click anywhere on that track to create a SFX clip. Similar to our independent SFX feature, simply start writing your prompt in the Speaker card above and click “Generate” to create your new SFX audio. You can lengthen or shorten SFX clips and move them freely around your timeline to fit your project - make sure to press the “stale” button if you do so.
  • Upload Audio: This option allows you to upload a non voiced track such as sfx, music or background track. Please keep in mind that if voices are present in this track, they won’t be detected so it will not be possible to translate or correct them.

Manual Dub

In cases where you already have an accurate dubbing script prepared and want to ensure your Dubbing Studio project sticks to your exact clips and speaker assignment, you can use the Manual Dub option during creation.

To create a Manual Dub, you’ll need:

  1. Video file
  2. Background audio file
  3. Foreground audio file
  4. CSV where each row contains a speaker, start_time, end_time, transcription, and translation field

The CSV file must strictly follow the predefined format in order to be processed correctly. Please see below for samples in the three supported timecodes:

  • seconds
  • hours:minutes:seconds:frame
  • hours:minutes:seconds,milliseconds

Example CSV files

1speaker,start_time,end_time,transcription,translation
2Adam,"0.10000","1.15000","Hello, how are you?","Hola, ¿cómo estás?"
3Adam,"1.50000","3.50000","I'm fine, thank you.","Estoy bien, gracias."
speakerstart_timeend_timetranscriptiontranslation
Joe0:00:00.0000:00:02.000Hey!Hallo!
Maria0:00:02.0000:00:06.000Oh, hi, Joe. It has been a while.Oh, hallo, Joe. Es ist schon eine Weile her.
Joe0:00:06.0000:00:11.000Yeah, I know. Been busy.Ja, ich weiß. War beschäftigt.
Maria0:00:11.0000:00:17.000Yeah? What have you been up to?Ja? Was hast du gemacht?
Joe0:00:17.0000:00:23.000Traveling mostly.Hauptsächlich gereist.
Maria0:00:23.0000:00:30.000Oh, anywhere I would know?Oh, irgendwo, das ich kenne?
Joe0:00:30.0000:00:36.000Spain.Spanien.

FAQ

A track clone refers to a voice clone that is derived from the entire track in a dubbing project. This means that the voice clone will be made from a combination of all of the clips on that track. This is the default behavior and is good for creating voice clones that have a bit of the characteristics of all the clips combined and usually give the AI enough data to create a proper clone. However, if the voice changes quite drastically throughout, it might create a voice that is a bit more unstable.

On the other hand, a clip clone refers to a voice clone that is derived from a specific clip on a track. This allows you to create different voice clones from specific clips and assign that same voice to other clips where you want the tonality or performance. This can be great if you feel like a specific track has exactly the performance you want and want to apply this to other clips too, or perhaps, you want to apply this to the whole track.

One helpful tip mentioned in the content is to find a clip that you like, where you feel the voice is good, right-click to create a clone from that clip, and then assign that clone to the whole track to achieve a consistent voice throughout. This is just one tip and may not work for all circumstances, but it can work very well in some cases.

By default, when you create a new dub, our latest Dubbing v2 model will be used. Dubs created using the v2 model are completely automatic without any option to edit the content.

If you want to use Dubbing Studio, you can do this by selecting Use legacy v1 Dubbing model in the Advanced options when you create your dub, then check the Create Dubbing project option. 

It’s not possible to convert an existing automatic dub to a Dubbing project.

The new dubbing project will appear at the top of your list of dubbing projects, and will go through various stages while generating.

Once it has completed processing, click the three dots icon and select Edit to open your dubbing project.

For more information about Dubbing Studio, please see our overview.

By default, when you create a new dub, our latest Dubbing v2 model will be used. Dubs created using the v2 model are completely automatic without any option to edit the content.

The edit button is only available when using Dubbing Studio, which is only available for our legacy v1 Dubbing model. To use Dubbing Studio, you will need to select Use legacy v1 Dubbing model in the Advanced options when you create your dub, then check the Create Dubbing project option. 

Note: Dubbing Studio is in maintenance mode and receives critical bug fixes only.

Try using a different browser and turning off ad-blockers and pop-up blockers.

Under certain circumstances, some people might experience problems downloading conversions done in Studio (previously Projects) and videos or audio dubbed using the dubbing feature. The common denominator for this seems to be the browser where most people are using a browser called Brave, which is causing issues for them. However, we’ve also heard certain users experience issues with other browsers. In most cases, the issue seems to be resolved when they switch or test a different browser to download the files. We also recommend turning off any ad-blocker or pop-up blocker.

If you downgrade your tier or cancel your subscription altogether, you will not be able to use the paid features anymore, such as Projects, Dubbing Studio, and Cloned Voices. However, at the time of writing this, we do not delete any of your data, and it will still be there when you feel ready to upgrade again.

At the moment, ElevenLabs does not offer lip syncing as part of Dubbing. Lip sync is available in Image & Video, Flows, and Studio via third party models.

The cost for dubbing depends on the duration of your dub, and the number of languages you’re dubbing into. The total cost will be displayed before you confirm your request.

Dubbing is available on all our plans, including the free plan. Dubs generated on free plans are automatically watermarked, with no option to remove this. Watermarking is not available on our paid subscriptions.

ElevenLabs was founded on the idea of creating amazing dubbing; a tool that would allow you to create a perfect dub in any language you desire, using the original voice of the actors and preserving the original performance, making all content more accessible.

To get started, go to Dubbing and upload your audio or video file, or paste a URL to dub a video from YouTube, TikTok or elsewhere online .

Select the language or languages you want to dub into in the Choose languages selector. You’ll be charged for each language you select here. 

By default, you’ll use our latest Dubbing model, v2. Dubs created using the v2 model are completely automatic without any option to edit the content.

When using Dubbing v2 via the website, there’s a 2 GB and 180 minutes limit for the uploaded file, and you need to stay below both. The Dubbing v2 API is not yet live but is expected to launch in the coming weeks.

If you want a more in-depth explanation and guide on what Dubbing is and how to use it, we highly recommend reading the full documentation here.

If you want to create a Dubbing Studio project, so you can edit your dubs, you can also choose Use legacy v1 dubbing model in the Advanced options. This will allow you to create a Dubbing Studio project by checking the Create Dubbing project option. 

Note: Dubbing Studio is in maintenance mode and receives critical bug fixes only.

You can output in the following formats:

  • MP4 (Video)
  • AAC (Audio)
  • AAF (Timeline data)
  • SRT (Captions)
  • WAV (Audio - separate tracks for each speaker, downloaded as zip file)

You can upload audio and video files in the following formats for Dubbing:

  • AAC
  • AIFF
  • AVI
  • FLAC
  • M4A
  • M4V
  • MKV
  • MOV
  • MP3
  • MP4
  • MPEG
  • MPG
  • OGA
  • OGG
  • OPUS
  • WAV
  • WEBA
  • WEBM
  • WMV
  • 3GPP
No results